How to write effective Bible study guides is about far more than organizing information. A well-designed guide helps students discover truth,
think independently, retain what they learn,
and grow spiritually rather than merely accumulate knowledge.
Roger Smalling
Introduction
Why study guides matter
I have often been told my teaching style and study guides are “clear and easy to understand,” though the subject may be difficult. A seminary leader suggested, “Why don’t you write an article on how you write effective study guides for our students?”
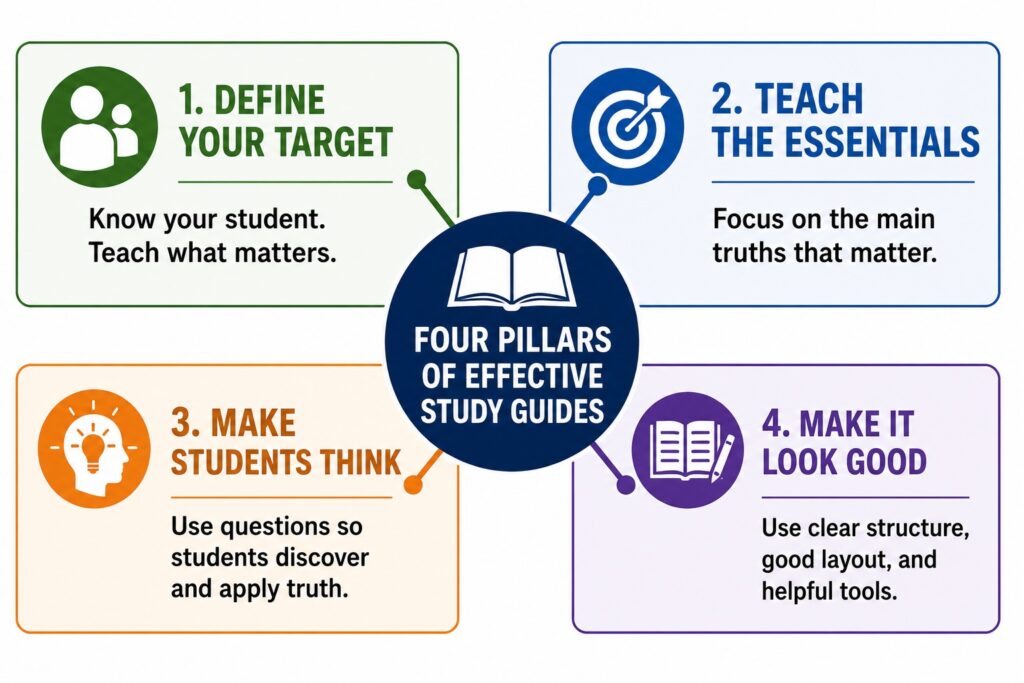
This article is divided into four sections.
Define your target to write effective Bible study guides
The first step in learning to write effective Bible study guides is to imagine a single individual as your target. We dilute our effectiveness if we try to accommodate an entire group with their different levels of comprehension.
As you write, imagine someone of your acquaintance, past or present, who may be interested in your subject. This is your target audience. While you write your study guide, picture yourself talking to that person.
Forget eloquence. Some writers seem more interested in showing off their literary skills and extensive vocabulary than communicating truth. Remember Paul’s injunction in 1 Cor. 2:1.
And I, when I came to you, brothers, did not come proclaiming to you the testimony of God with lofty speech or wisdom.
Ask yourself, what is critical to your target? Is she a mother with young children? We already know her priorities. She is unlikely to recall what does not affect her life. For example, if we were teaching on the sovereignty of God, the lesson would affect how she prays and her relationship to the promises of God. Or how original sin affects her and her kids.
Though she may forget the theological vocabulary, she will communicate the truths to others with the authenticity born of her own experience.
Do not focus on the weakest student in the class. That risks losing the keenest and causing boredom for others.
Personalize the teaching
Express how the teaching affects you personally. Illustrate how you apply it to solve problems or bring positive change. This brings them the promise of practical implications for life.
Are we preparing scholars or training effective Christians? The answer to that question will determine the outcome of our writing.
Growth is the goal
Grow in the grace and knowledge of our Lord Jesus Christ. 2 Peter 3:18
The goal of Christian education is to grow in grace so that we are prepared for ministry. Yet ministry is really a way of life. Where appropriate, show how each point is relevant to that. If you cannot present that, you may want to cut the point.
Avoid the temptation to impress other theologians. Doing that is the worst possible way to prepare an effective study guide. Do you find material written by theologians for other theologians to be exciting and interesting?
Provide a resource list for those who wish to approach your subject from a more profound theological perspective.
Teach the essentials
Some truths are more important than others. Truths that inspire you might not be essential to the main point. Some elaborate on topics obviously interesting to them. They may be simply entertaining themselves.
A pastor was preaching on the Israelite town of Mizpah and its history. In the meantime, people in the audience were suffering various life problems. Others were bored. This preacher was the only one interested in the subject.
Define the essentials
Can you state in one sentence the main point of the entire study guide?
The one-sentence description of my course on Reformed Ecclesiology is: Biblical church government consists of committees of ordained elders.
My study guide on doctrines of grace: Salvation is by grace alone through faith alone, applied by Christ because of his perfect sacrifice.
Another helpful exercise is to state in three sentences the essential points your students must grasp to have a general perspective of the course.
Make students think
In some cultures, the education system discourages independent or creative thinking. Children copy material to a notebook to memorize and repeat on an exam. Little rational thought is involved and certainly nothing creative.
Such so-called education may be the product of a history of dictatorships, political or religious. Dictators prefer their people avoid thinking too deeply. Citizens might evolve dangerous ideas like freedom or democracy. So children are taught that “learning” means memorizing and obeying what is taught.
One of our students said, “Just tell me what to believe and I’ll write it down.” She was expressing discomfort with some of our inductive methods. Some feel this discomfort initially because their minds have rarely been challenged to evaluate evidence for themselves. Once they get used to learning inductively, the discomfort disappears, and they take to it with delight and enthusiasm.
Deductive versus inductive
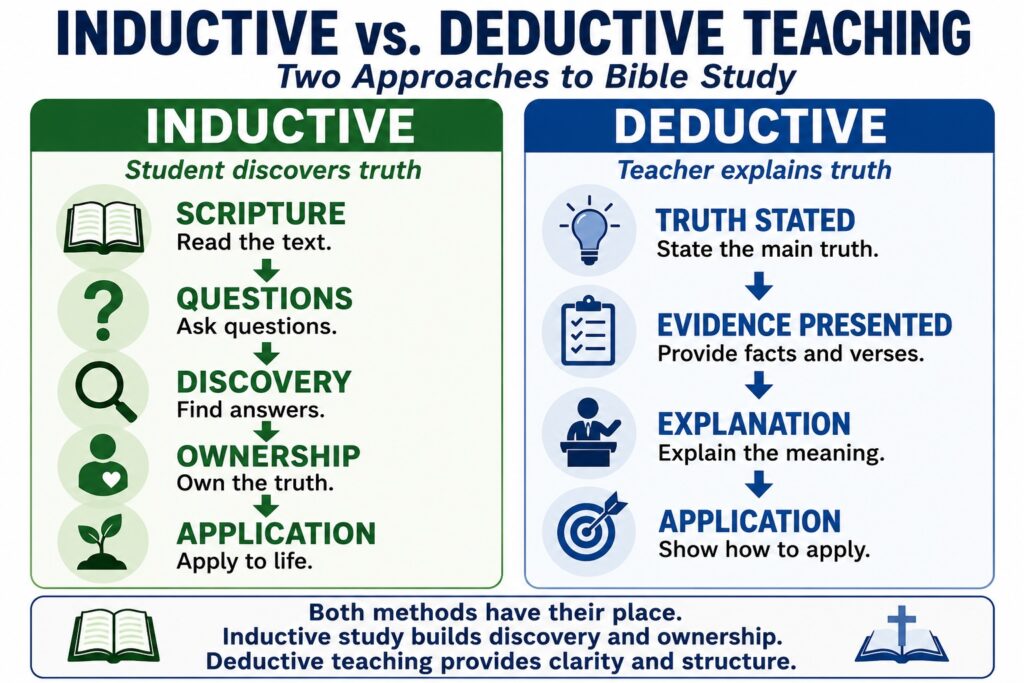
A detective investigating a crime gathers evidence without bias and draws a conclusion. This approach is inductive. He does not set out to prove anyone’s innocence or guilt.
A prosecuting attorney, however, possesses the evidence discovered by the detective and states in court that he will prove the guilt of a suspect. He then lists the evidence that supports his claim. That is deductive.
A detective who goes about to prove a person guilty is biased. A prosecutor who fails to state his case in court before proceeding is failing in his job.
Two ways exist to convince a class of a point:
- Give them the evidence first and then ask what it proves. This is inductive.
- Tell them what to believe and then show the evidence to prove you are right. This is deductive.
Neither approach is right or wrong. It depends on what we are doing.
Sermons tend to be deductive. The preacher states his belief and then shows the scriptural evidence. This is necessary because there is normally no dialogue between the preacher and his audience.
Most books are written deductively for the same reason. People generally read nonfiction books because they want the data relative to the stated subject.
Benefits of inductive teaching
When students feel they have found a truth through their own research, they own it. By owning it, they see implications that mere memorization fails to deliver.
The inductive approach is best, in my opinion, for smaller groups where interaction is possible. The benefits far outweigh the downside in preparing these study guides.
Is there a downside? Inductive study guides are harder to write, more time-consuming, and require more creative thinking. The formatting may be more tedious.
In the long run, the inductive approach pays big dividends for the teacher. The act of teaching is less stressful because the students are doing the work. A dictum about teaching says, “If you are working harder in the classroom than the students, then change your style.” Allow the students to do the work.
Avoid extremes
A psychologist in the last century by the name of Carl Rogers invented non-directive counseling. The idea was to avoid telling the client what he should do but let him come to the conclusion on his own, based on minimal guidance from the counselor. Rogers believed the counselor should be a facilitator, not a teacher.
Rogers’ approach was based on the humanistic assumption that mankind’s nature is fundamentalliy good. By tapping into that innate goodness, a person should come to the correct conclusion on his own.
This idea infiltrated itself into the American school system for a while. Teachers were supposed to think of themselves as facilitators of learning. Result? Disaster! Students were not learning.
A knowledgeable Christian could have told those educators why their approach was doomed to failure. We are fallen creatures. In that fallen state, teachers are indispensible.
No ministry gift of facilitator exists in the Bible. If fallen human beings were able to discover truth on their own, we would not need a savior. If regenerate people were able to mature in Christ on their own, they would not need pastors and teachers.
Do not let the facilitator idea keep you from declaring the truth plainly. The inductive approach is simply a way to go about that. You are a teacher. Teach!
Although at Miami International Seminary (MINTS) we use the term “facilitator,” this is intended in the sense of a fledgling teacher who is taking the course by teaching it and learning didactic skills in the process.
Despite our fallen condition, we are still the image of God with the faculty of reason. We must respect that image in our students. Though our teaching must be with authority, it need not be authoritarian. We give credit to our students for their reasoning ability that remains in their nature and help them learn to use it.
On one hand, we respect the ability of students to reason beyond mere memorization. Yet we honor our own gift and office as teachers by teaching with authority.
God put his treasures in earthen vessels, human beings. The study guide is no substitute for a flesh-and-blood teacher. You as a teacher are essential. The study guide is never a substitute for you.
Simple inductive devices
Use Scripture first
In case of doubt about how to proceed, start with the word of God whenever possible. Give some verses with a question, “What do these verses tell us about this point?”
Example: In my Ecclesiology course, I ask, “What are the functions of elders in Acts 20?”
The students discover the answers by themselves. They appropriate the conclusion because the word of God says so, not because the teacher told them to believe it.
The teacher has room to elaborate since this approach has already engaged the attention of the students. This becomes similar to a dialogue and makes the class more interesting.
Testimony
Share how the material has affected you personally. This takes the subject out of the abstract into the reality of life. We may end up showing people how to get a degree rather than preparing them for life and ministry.
Introduce the point with short personal experiences when appropriate.
Stories
In a lecture on spiritual warfare, I started with, “I was attacked by a large dog while walking in the park.” That got their attention. The dog was on a long leash, I explained, so I was not seriously injured. From there, I led into a comparison about dealing with attacks from the devil.
Such stories must be kept short to avoid using too much time. A simple two- or three-sentence anecdote may be sufficient.
If we draw a picture in the mind of the student, especially from events with which they are familiar, we increase retention. The Bible calls these “parables.”
Simple graphics
While in high school, I considered a career in biology because of a profound interest in nature. I approached the teacher and inquired about qualifications to become a biologist. Among other things, he said I must be able to draw fairly well to illustrate a creature I may have observed if I did not have a camera. Since I cannot draw a circle that actually looks circular, this presented a problem. We both agreed another career choice besides biology might be better.
In my study guides, the reader will nevertheless notice occasional graphics, usually a simple geometric figure such as circles, squares, triangles, arrows, or a combination of these. I appreciate computers that can draw circular circles.
With a little imagination, most ideas can be illustrated by a simple geometric figure or a combination thereof.
Which of the figures mentioned above could we use to describe the Trinity? The triangle, obviously. How to describe eternity? The circle.
How could we combine a triangle and a circle to show the Trinity is eternal?
Suppose you needed to refute the false teaching that Jesus is a created god. This simple graphic, backed up by Scripture, would be a powerful tool to root it in the minds of the students.
Use this kind of graphic sparingly. If we add too many, our manual will resemble a child’s coloring book.
Avoid graphics with colors! Stick with black and white. In some classes, it is customary to photocopy the student’s manual and distribute it at the beginning of a course. Graphics with colors photocopied in black and white usually look atrocious and use more ink than they are worth.
Show, don’t tell
In any TV drama, the scriptwriters must identify the good guy versus the bad guy. We see no titles on the screen that say, “This is the bad guy.” If we see a character doing wrong things and proud about it, we know he is the bad guy.
Then we see another character upset about the bad things happening or doing something heroic or kind for someone. This identifies the good guy. We see no label, “good guy.”
That is the difference between showing and telling. Good storywriters always do that. It is a form of inductive writing. Keep this in mind when telling anecdotes to illustrate your lessons.
Start and end with Scripture
While teaching the doctrines of grace in Ecuador, one student frequently challenged my assertions. I felt that in his case it would be best to avoid arguing. So when he asked a provocative question, I simply wrote Scripture references on the board and told him to look them up and read them to the class. This avoided a confrontation.
Eventually his attitude changed. Later, he confessed he was deliberately trying to be provocative but found he could not argue with the Scriptures, so he decided to be quiet and listen.
Even the apostles were careful to use Scripture. In Paul’s great dissertation on the meaning of the gospel, the Epistle to the Romans, he referred to Old Testament Scriptures as the grounds of his arguments. He took the experiences of Abraham and elaborated on them as proof of his doctrine.
Paul could have taken an authoritarian approach and told his readers they should believe him because he was an apostle. Though he had apostolic authority, this did not seem to be foremost in his teaching. Scripture was primary.
Some subjects like history may not be conducive to this. Make allowances where necessary.
Make it look good
Teacher and student editions
When I write a course, I produce two study guides, one for the teacher and the other for the students. This sounds like double the work, but it is not.
The teacher’s manual comes first because it contains instructions to the teacher along with answers to the questions. These private items should be in another font, perhaps smaller and indented or another color. When you are ready to produce the student’s manual, make a copy of the teacher’s manual and delete all the private items directed to the teacher. This takes little time. The result is the same basic text for both study guides, without confusion.
After the course, I make the teacher’s guide available to the students in case they want to teach it.
Use headings instead of outlines
Look at the traditional outline form below and ask yourself if it is attractive:
- Main point
- Subpoint
- Subpoint
- Sub-sub point
- Sub-sub point
Personally, I find it unattractive and boring.
Does logic have to be ugly or boring? The traditional outline form is both. Worse, it is a pain to work on most word processors, takes time to get it right, and lacks appeal.
An attractive format is H headings, such as in Microsoft Word. I use only the first three, H1, H2, and H3, just as I have done in this paper. If you are unfamiliar with the Word styling feature, go online and find a tutorial. It will be well worth your time, and you will wonder afterwards how you ever wrote without them.
If you are writing your lessons by hand, a good trick is to indent your subheadings and use two different colored markers. You might use green for main points and yellow for sub-points.
Examples of headings: The three main headings in a word processor are H1, such as This is an H1 heading. The H2s are the main subheadings, such as in bold italics, size 14, to clearly distinguish them from the H1 headings. Then follow the H3 subpoints in a smaller brown 12, indented to distinguish these from the first subheadings.
Nothing limits us to these particular text formats for the headings. We are free to use any font, size, color, or attribute we wish. The wonderful thing about using H headings is that we can change them all at once throughout our document by simply altering one of the H-texts, such as an H3 style, for example. Then in the Styles menu box, we select Update to Match Selection. Every H3 heading in the entire document will be changed.
Two other important reasons to use H headings are the following:
- Search engines locate the documents better because the robots look for H headings.
- If we put a document on Amazon Kindle, then Kindle software automatically generates a Table of Contents based on the H1 headings. If we format our chapter titles as H1, then those titles will be the table of contents, generated automatically. This avoids having to write a table of contents.
Avoid listing items numerically if the list is short, like three or four points. Simple bullet points like those above have more eye appeal. I normally use manually generated bullets, not the auto-formatting ones if I intend the document for the internet. Occasionally the internet messes up the bullet points created by Word.
On the Mac keyboard, the manual button is above the number 8, accessible with the option key.
I use numbered lists for exam questions in the study guides because it is easier to review them with the students.
As you scroll through this study, do you find anything unclear about the formatting? Is there any place where traditional outlining would make it clearer or more attractive?
Simple summaries
Scientific studies in memorization show that retention increases dramatically when students review the material immediately after the lesson. That is why I often include two elements for review at the end of each lesson: Summary statements and quizzes.
At the end of each lesson I add the following: From this lesson we learn…
Then follows a series of one-line bullet points of the key elements in the lesson. This is easier to write and more practical than a prose summary. The teacher may glean from these summary statements to prepare the final exam.
Quizzes
I often include a brief quiz at the end of a lesson. Some students relish the challenge. A student reads a question out loud, and the others answer. This provides students the opportunity to show the teacher they have grasped the material. Most students relish the competition.
Such an exercise may generate discussion if students challenge the answer. That’s a healthy thing because it helps root the subject in their minds. Or, the teacher may provoke dialogue by asking the students why the answer is one thing and not another.
A psychological benefit accrues to laymen who have been out of school for some years. Some feel intimidated by formal studies, lacking the confidence that they can pass exams. When they do well on these short quizzes, they gain confidence and excel.
True-false questions are the easiest to write. The teacher may incorporate some of these in the final exam. This saves the teacher preparation time.
Conclusion
When these principles are applied consistently, you will write effective Bible study guides that make the teaching process easier on you and intriguing for your students.
###
For examples of these teaching principles:
See our Teacher’s Resources.
Related Article:
Creative Thinking
If you liked this article, you may enjoy our book,